Van Life Mattress and Seating Foam: The Complete Conversion Guide
The van life movement has exploded. Whether you are building out a Sprinter, Transit, ProMaster, Econoline, or vintage VW, there is a moment in every van conversion where you face the foam question: what material goes on your sleeping platform, dinette seats, and lounge areas? Get it right and your van is a genuinely comfortable living space. Get it wrong and you spend every night on a surface that makes you wish you had booked a hotel.
This is the area where many van builders cut corners — either buying cheap pre-cut foam from a big box store or repurposing an old mattress that does not fit the space. Neither option delivers the comfort, durability, or precise fit that makes a van conversion feel finished.
Custom-cut foam solves all three problems. You specify the exact dimensions (including irregular shapes that follow your van's interior contours), choose the density and firmness that matches your comfort preferences, and receive foam that fits your build perfectly. This guide covers every foam surface in a van conversion.
Foam Applications in a Van Conversion
A typical van build includes several distinct foam surfaces, each with different requirements:
Sleeping Platform (The Main Bed)
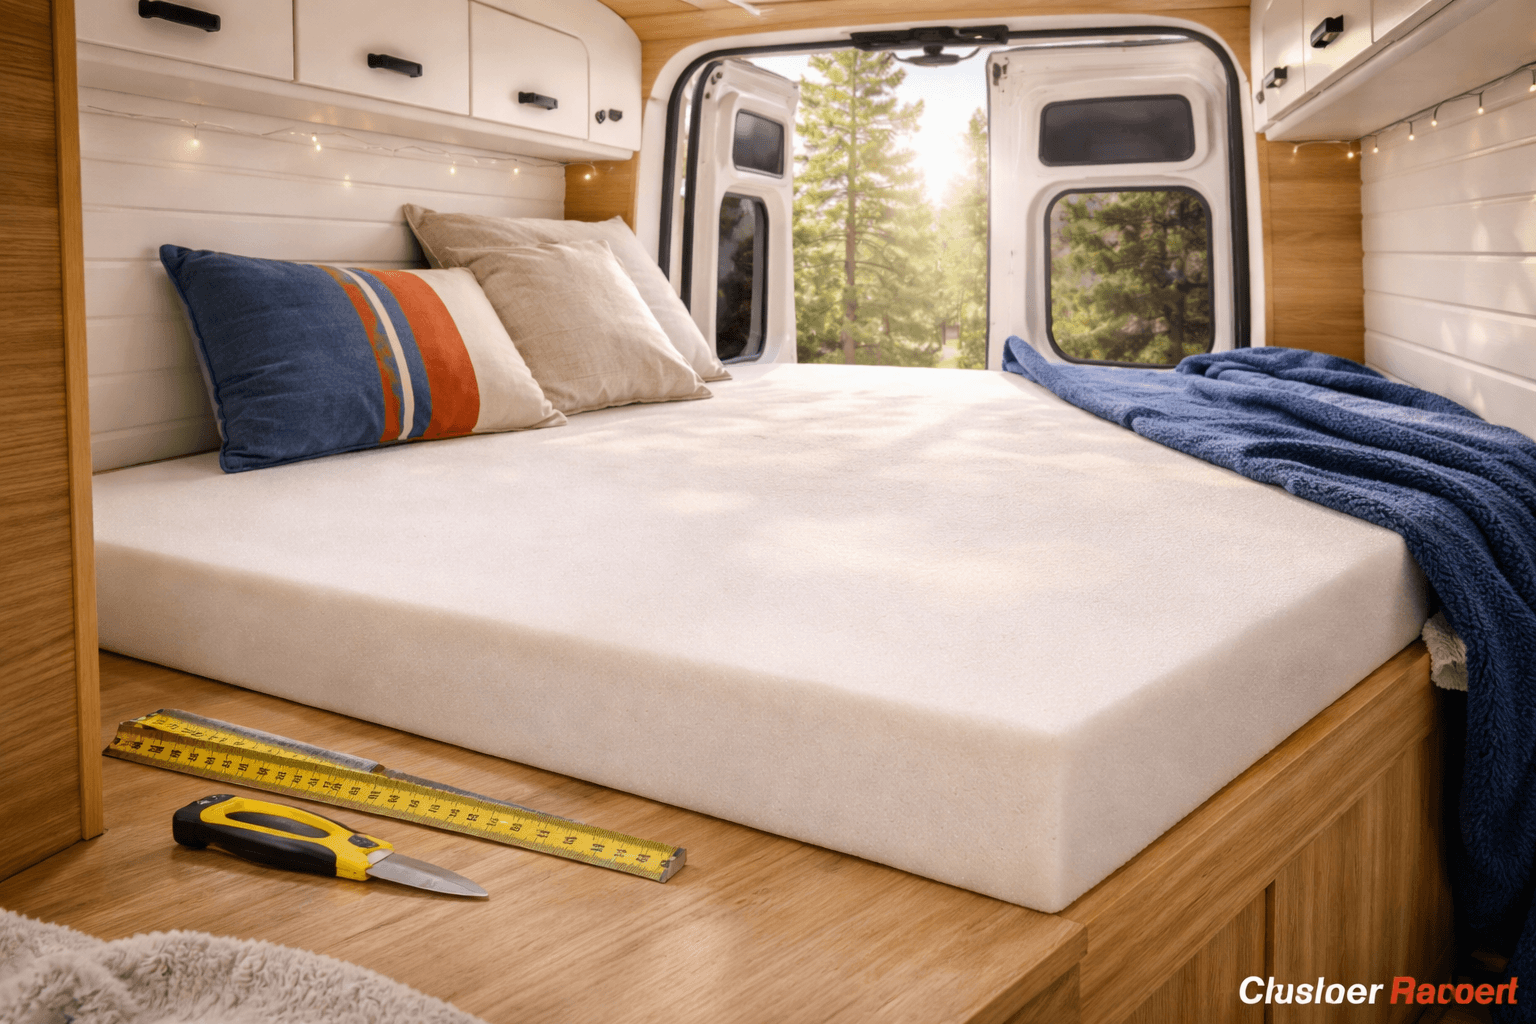
This is the most important foam surface in your van. You will sleep on it every night — sometimes for weeks or months straight during extended travel. The sleeping platform is also often the largest single piece of foam in the build and the most expensive, so getting it right matters.
Recommended foam: 2.8 lb/ft³ high-resiliency indoor foam, medium-firm, 5 to 6 inches thick.
Five inches is the minimum for comfortable sleeping. Six inches is better if you have the vertical clearance — the extra inch provides noticeably more pressure relief for side sleepers and people over 200 pounds. For weight-specific recommendations, see our foam guide for heavier individuals.
Medium-firm is the ideal firmness for a sleeping surface that also serves as a seating area during the day. Soft foam feels great for sleeping but collapses under seated weight. Firm foam supports sitting but creates pressure points for side sleepers. Medium-firm splits the difference effectively.
Our 2.8 lb HR foam uses a cold-cure process that creates progressive support — softer on initial contact, firmer as you sink deeper. This two-stage feel works exceptionally well for sleeping because it cushions your shoulders and hips while supporting your spine. For the technical details, see our high resilience vs. high density foam comparison.
Dinette / Convertible Seating
Many van builds include a dinette area that converts between a seating configuration (for meals, working, and socializing) and a flat sleeping surface (for guests or as the primary bed in smaller vans). The foam for this area needs to perform double duty.
Recommended foam: 2.8 lb HR indoor foam, medium-firm, 4 to 5 inches thick.
Four inches is sufficient for dinette seating that occasionally converts to sleeping. Five inches is worth the extra cost if the dinette is your primary sleeping surface. The cushions need to be firm enough to sit upright on during meals but soft enough to sleep on comfortably.
Cab-Over Sleeping Area
Some van builds (particularly high-top conversions and Class B+ rigs) include a sleeping platform above the cab. This area often has tight vertical clearance, limiting mattress thickness.
Recommended foam: 2.8 lb HR indoor foam, medium-firm, 4 inches thick. If clearance is extremely tight, 3 inches of medium-firm foam will work — it is a compromise on comfort but still vastly better than the one-inch pad many builders use.
Lounge / Daybed Cushions
Dedicated lounge areas — seating along one wall, a daybed configuration, or a rear lounge — prioritize seating comfort during the day with sleeping as a secondary function.
Recommended foam: 2.8 lb HR indoor foam, medium-firm, 4 to 5 inches thick. Same spec as the dinette unless the lounge is purely decorative seating that will never be slept on, in which case 3 to 4 inches is adequate.
Exterior / Awning Area Cushions
Some van builds include seating for the outdoor area under an awning — folding benches, removable cushions that go on camp chairs, or cushions that sit on a tailgate platform.
Recommended foam: Dry Fast outdoor foam, medium firmness, 2 to 3 inches thick. Any cushion that goes outside the van needs outdoor foam for moisture resistance. For the full reasoning, see our indoor vs. outdoor foam guide.
Measuring Foam for a Van Build
Van interiors are notoriously non-rectangular. Wheel wells intrude into the floor plan. Walls curve. Corners are radiused. No two vans — even the same model and year — are exactly identical due to manufacturing tolerances. This makes accurate measuring critical.
The Paper Template Method (Recommended for All Van Builds)
Paper templates are the gold standard for van foam measurement because they capture every curve, notch, and irregularity:
- Lay craft paper or cardboard over the sleeping platform or seating surface.
- Trace the exact outline, pressing the paper into every corner, around every wheel well intrusion, and along every curved wall.
- Mark orientation — label front, back, left, right, driver side, passenger side.
- Note thickness on each template.
- Photograph each template on the platform with a tape measure visible for scale.
This is the same method used for boat cushion foam and RV cushion projects where irregular shapes are the norm.
Multi-Piece vs. Single-Piece Mattresses
For sleeping platforms wider than 76 inches (the maximum width of a single foam piece), you will need two pieces that sit side by side. This is common in full-width Sprinter and Transit platforms. The seam between pieces is not noticeable under a fitted sheet.
For mattresses that fold (tri-fold or bi-fold configurations for accessing under-bed storage), measure each panel individually and order them as separate pieces. The fold points are the natural division lines.
Common Van Dimensions
These are approximate platform dimensions for popular van models. Always measure your specific build.
| Van Model | Approximate Sleeping Platform | Notes |
|---|---|---|
| Mercedes Sprinter 144 | 52–56 × 72–78 inches | Width varies by wheel well clearance |
| Mercedes Sprinter 170 | 52–56 × 80–86 inches | Longer wheelbase = longer platform |
| Ford Transit 130 | 50–54 × 70–76 inches | Slightly narrower than Sprinter |
| Ford Transit 148 | 50–54 × 78–84 inches | Extended length version |
| Ram ProMaster 136 | 54–58 × 72–78 inches | Wider than Sprinter/Transit |
| Ford Econoline / E-Series | 48–52 × 68–74 inches | Older model, tighter interior |
| VW Transporter / Vanagon | 44–48 × 68–72 inches | Compact builds |
Ordering Van Conversion Foam
Standard Rectangular Platforms
For platforms that are rectangular or near-rectangular, use our foam configurator directly. Select Indoor Cushion Foam, choose the rectangle shape, enter your dimensions, and see your price.
Irregular Shapes (Wheel Well Cutouts, Curved Walls)
For platforms with wheel well intrusions, curved sides, or other non-rectangular features, contact our team with your paper templates and photos. We will provide a custom quote and cut the foam to match your specific van layout.
Pricing Examples
| Van Foam Project | Typical Dimensions | Approximate Cost |
|---|---|---|
| Main bed (single piece) | 54 × 76 × 5 inches | $143.64 |
| Main bed (single piece, 6 inch) | 54 × 76 × 6 inches | $172.37 |
| Dinette seat (one bench) | 40 × 16 × 4 inches | $17.92 |
| Dinette back (one bench) | 40 × 14 × 3 inches | $11.76 |
| Full dinette set (2 seats + 2 backs) | Mixed | ~$59 |
| Cab-over bunk | 48 × 54 × 4 inches | $72.58 |
| Complete van (bed + dinette + lounge) | Full build | $200–$450 |
Free shipping on orders over $199 — most complete van foam projects qualify.
Installation Tips for Van Builds
Fitted Sheets Over Foam
For the sleeping platform, a fitted sheet directly over the foam is the simplest approach. No cushion cover needed. This makes it easy to wash sheets during travel and keeps the setup minimal. Use a deep-pocket fitted sheet that accommodates 5 to 6 inches of foam thickness.
Moisture Management
Vans generate condensation, especially during cold weather camping. Moisture forms on cold surfaces — including the bottom of your sleeping platform where the van's metal floor or wooden platform substrate meets warm interior air.
To prevent moisture from accumulating under the foam, place a breathable moisture barrier between the platform and the foam. A simple solution is a layer of Hypervent or DriDek mesh mat, which creates an air gap that prevents condensation from soaking into the foam from below.
Velcro for Dinette Cushions
Dinette cushions that convert between seating and sleeping configurations need to stay in place during both modes. Adhesive-backed Velcro strips on the platform and cushion bottoms keep everything secure while allowing easy reconfiguration.
Cutting Your Own Adjustments
If your foam needs minor trimming after delivery — rounding a corner slightly, or shaving a quarter inch to fit around an obstruction — an electric carving knife (the kind used for Thanksgiving turkey) works perfectly on foam. Cut slowly and steadily for the cleanest edge.
Foam Comfort Upgrades for Serious Road-Trippers
The Comfort Layer Strategy
For the ultimate sleeping surface, consider a two-layer approach:
- Base layer: 4 inches of 2.8 lb HR foam in medium-firm (structural support)
- Top layer: 1 to 2 inches of soft HR foam or memory foam (comfort layer)
The firm base prevents bottoming out and provides spinal support. The soft top layer cushions pressure points at the shoulders and hips. This mimics the construction of high-end mattresses at a fraction of the cost.
Order each layer separately through the configurator and stack them on the platform. Spray adhesive can bond the layers together if desired, or leave them separate for flexibility.
Temperature Considerations
Foam firmness is affected by temperature. In a cold van (before the heater warms up), HR foam is slightly firmer. In a hot van, it softens slightly. These changes are minor with HR foam — far less pronounced than with memory foam, which becomes noticeably stiff in cold conditions and overly soft in heat. This is one reason we recommend HR foam over memory foam for van builds where temperature swings are a daily reality.
For more on the performance differences between HR foam and memory foam, see our foam density and firmness guide.
Frequently Asked Questions
Can I use a regular mattress in my van?
You can, but regular mattresses have significant drawbacks for van builds. They are heavy, do not fit non-rectangular platforms, cannot be cut to accommodate wheel wells, and are difficult to fold or section for storage access. Custom-cut foam solves all of these problems while providing equal or better sleeping comfort.
How do I keep foam from getting musty in a van?
Ventilation is key. Use a moisture barrier/mesh mat under the foam, crack a window or run a vent fan when sleeping, and occasionally stand the foam on its side to air out the bottom surface. The foam itself does not grow mold unless it stays wet for extended periods. For foam care best practices, see our foam care and storage guide.
Should I use outdoor foam for all van surfaces?
Only for exterior surfaces. Indoor HR foam is significantly more comfortable for sleeping and extended sitting. The inside of your van is an enclosed, sheltered space — the same as any indoor room. Use indoor foam for interior surfaces and save outdoor foam for awning-area and exterior cushions.
What about folding the mattress for storage access?
If your platform has a hinged top for storage access, you have two options: order a single piece of foam and fold it back (HR foam bends readily and does not crack), or order two separate pieces that split at the hinge line. Separate pieces are easier to manage and do not develop a permanent crease at the fold point over time.
The Bottom Line
The sleeping and seating surfaces in your van conversion are the foundation of your daily comfort on the road. Cheap foam turns a dream build into a nightly regret. Professional-grade 2.8 lb HR foam, cut to your van's exact dimensions, delivers genuine comfort that lasts for years of full-time or recreational travel — and the total foam cost for a complete van build is typically $200 to $450. That is a tiny fraction of any conversion budget for a massive quality-of-life improvement.
Ready to foam your van build? Build your custom order →
Explore our RV and camper cushion page for related builds, or visit our foam-cut-to-size page for custom shapes and dimensions.

